Tracking HTTP error codes in your website is vital for maintaining several important aspects of your website's overall health, performance and SEO. By tracking HTTP error codes, you can quickly identify and resolve issues that may negatively impact your website's search engine rankings. For a broader automated audit, see the technical SEO audit with Google Apps Script. In addition, it will help you monitor any aspect of your website that may negatively affect user experience and overall website performance.
In this article, I have provided a very simple step-by-step guide that can be helpful if you want to track HTTP Error Codes via Google Tag Manager and Google Analytics. You can learn how to create a Google Analytics 4 Event Tag that will get activated only when a HTTP Code other than 200 returns.
What are HTTP Status Codes?
HTTP Status Codes are codes that servers generate when a client makes a request to a web pages. In return HTTP Status specifies the status of the request whether it succeeds or fails.
HTTP Status Code segments can be listed as such:
-
- 1xx Informational Codes
-
- 2xx Success Codes
-
- 3xx Redirect Codes
-
- 4xx Client Related Errors
-
- 5xx Server Errors
In terms of SEO, all of these groups are very important. However, within the scope of this article I will only focus on HTTP Error Codes that are most critical to track.
Why Is It Important to Track HTTP Error Codes?
In order to have a healthy, SEO-compatible and high-performance website it is extremely important to track and resolve server error codes that may occur on your website. This is because when search engine crawlers visit a website and encounters 4xx or 5xx errors, they'll not be able to crawl or index those pages. Such errors also negatively affect search rankings. Most search engine algorithms tend not to favour websites with frequent server errors or broken links.
How to Set Up a GA4 Event Tag for HTTP Error Codes with Google Tag Manager
As mentioned, I'll explain how you can set a Google Analytics Event Tag that will get activated only when a user encounters an HTTP error code, such as 404 or 500, while visiting your website.
In order to that we must first create a custom javascript variable that will return the HTTP Status Code of the opened page.
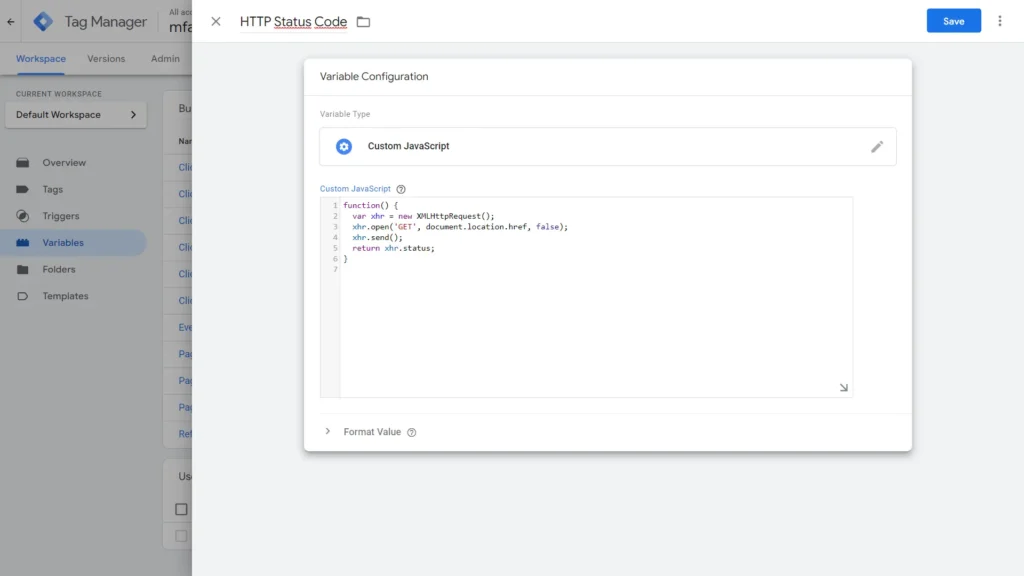
How to Create a Custom Variable in GTM to Retrieve HTTP Status Code
To create a Custom Variable that will return the HTTP Status Code, follow the steps given below:
> Hit Variables
> Scroll Down and Click New
> Name it and Hit Variable Configuration
> Choose Custom Javascript
> Enter the following code and Save
function() {
  var xhr = new XMLHttpRequest();
  xhr.open('GET', document.location.href, false);
  xhr.send();
  return xhr.status;
}
Now, this Custom Javascript Variable that we've created will return the HTTP status code of the response made by the web page. A succesful request to a page of the website will return a 200, meanwhile a request to a non-existent page such as '/page-not-found' will return a 404 code, indicating that the requested resource could not be found on the server.
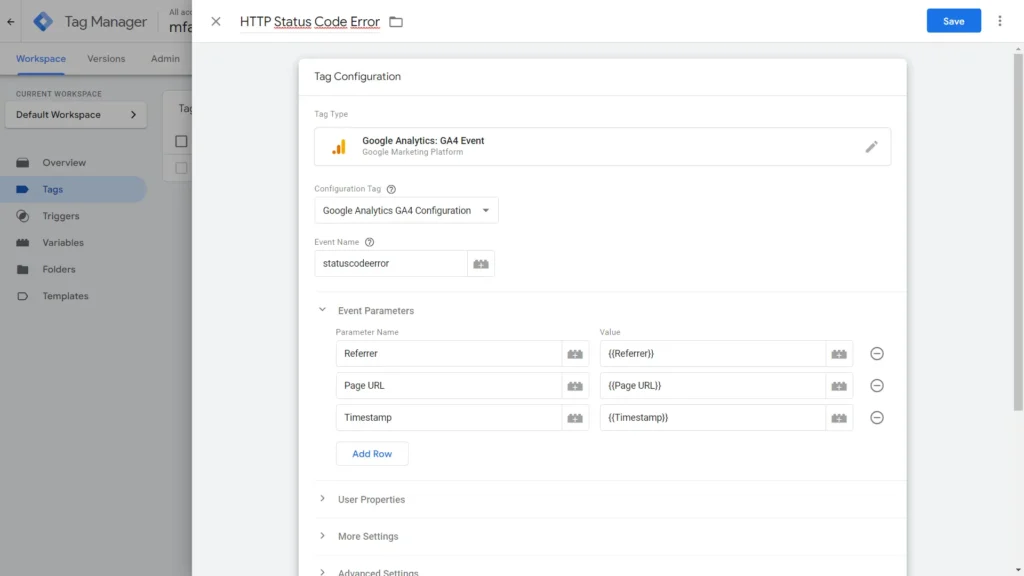
HTTP Status Code Error Event Tag Configuration Settings
In order to properly set a GA4 Event Tag Let's follow these steps:
> Create a New Tag
> Name it as "HTTP Status Code Error"
> Click Tag Configuration
> Choose Google Analytics: GA4 Event
> Select your GA4 Configuration Tag
> Name our event as "statuscodeerror"
> Hit Parameters and add the following rows:
> {{Referrer}} to know from which page the error was triggered
> {{Page URL}} to identify the URL where the error occurred
> {{Error Description}} to provide a description of the error
> {{timestamp}} to capture the time of the error occurrence. (Optional)
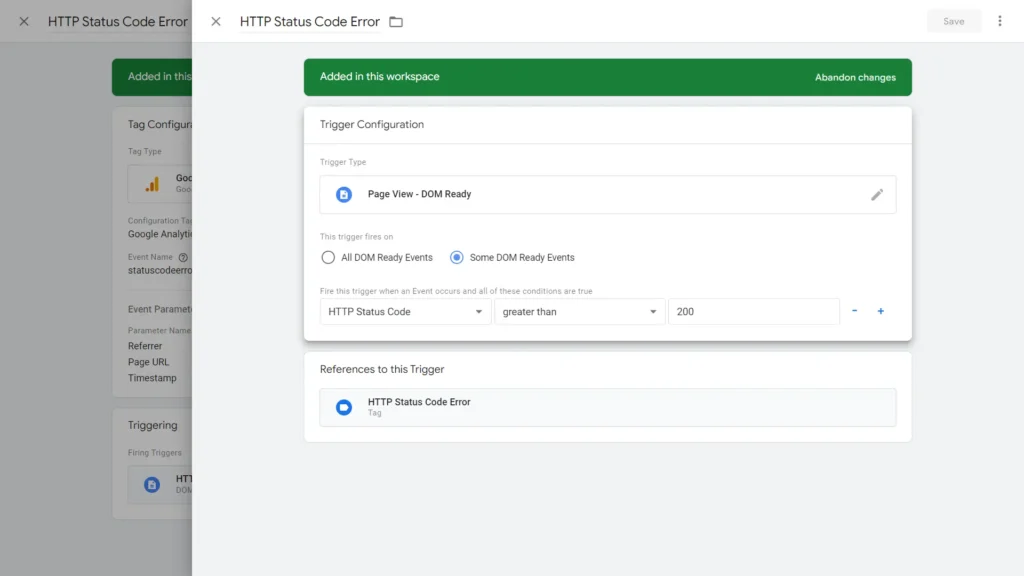
Now that we have completed the tag configuration we can add a trigger to our tag.
To add a trigger to our tag follow the steps:
> Scroll down and click Triggering
> Click '+' Sign on top the right
> Name the Trigger as "HTTP Status Code Error"
> Hit Trigger Configuration
> Choose DOM Ready
> Opt Some DOM Ready Events
> Choose HTTP Status Code from the drop-down menu
> Condition as "Does not equal to" or "Greater than"
> Enter "200" and Save
Now if we wanted to track only a single error code we would enter for example '410' as a and choose the condition as equals. However, because we want to track all of the errors that are not 200 succesful hits we'll continue like this.
If you want to track within specific metrics you can choose 'Greater than' and enter '400' as a value or 'Greater than or equal to' ,'500' etc. It's up to you!
Testing HTTP Status Code Error GA4 Event Tag in the Preview Mode
Now let's test whether our newly created tag works or not. In order to do that hit Preview and connect to the Tag Asisstant Window. Now scroll down and we see that I've put there 3 links for our test purposes. I click "How to Use Google Tag Manager: A Step-by-Step Guide" article in the new tab, and then I click the 404 Image Link to open it in the new tab and finally I click the post named Test5 and open it in the new tab. Now let's get back to Google Tag Manager Preview tab to see whether our tag has successfully get activated.
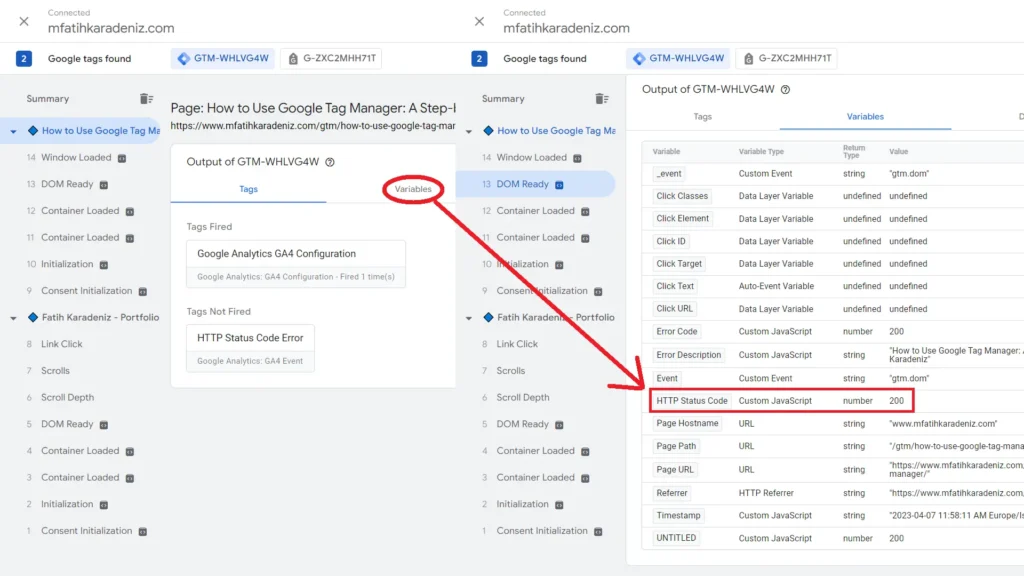
Now when we click the first tab we opened we can see that our tag has not been fired. This is because this page returned 200 as a HTTP Status Code, meaning that there are no errors. So it is normal that our tag was not activated when we opened this page.
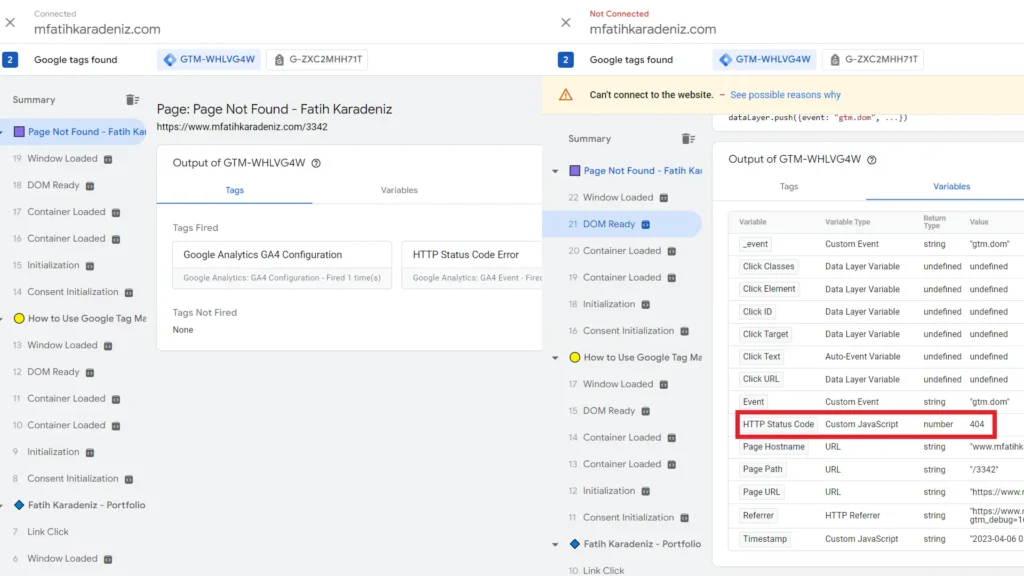
However, the 2nd tab we opened, which we previously stated that was a 404 page, shows that our HTTP Status Code Error tag has fired succesfully. When we click DOM Ready and then hit Variables we will see that:
-
- HTTP Status Code Variable returns "404"
-
- Error Description returns "Page Not Found - Fatih Karadeniz"
-
- Referrer as "https://mfatihkaradeniz.com/?gtm_debug=1680787386256"
-
- Broken Page URL as "https://mfatihkaradeniz.com/3342"
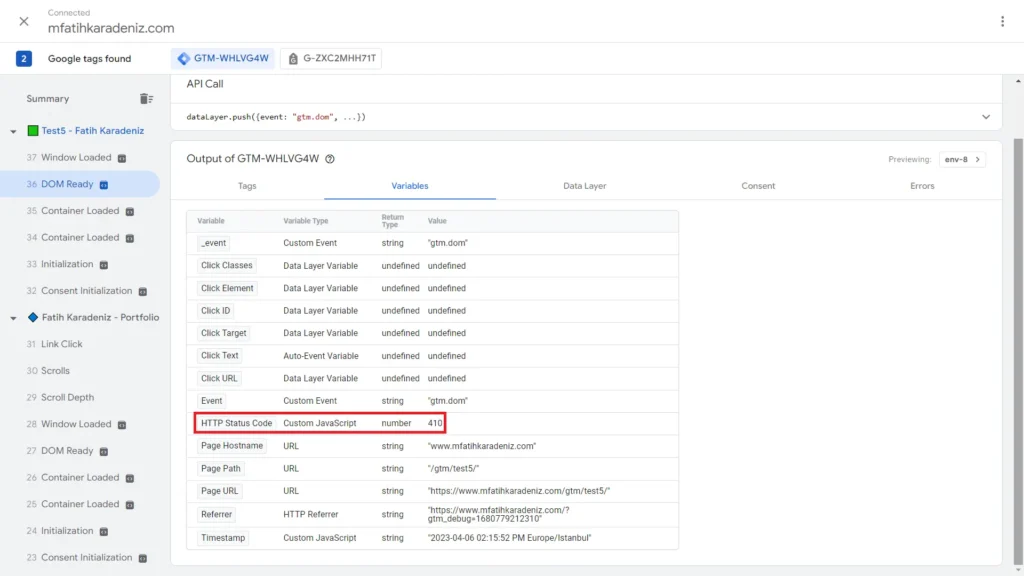
To further test whether our tag works efficiently let's view the 3rd tab we opened. But before doing that it is important to let you know that I've previously marked that URL on the 3rd tab '410' as its HTTP Status so that it'd return something different than 404 Status code. Let's click the tab. The tag has been fired. To follow, click Variables and we'll see that:
-
- HTTP Status Code Variable returns "410"
-
- Referrer as "https://mfatihkaradeniz.com/?gtm_debug=1680787386256"
-
- Broken Page URL as "/gtm/test5/"
In short, we can proudly say that we have successfully created a HTTP Status Code Error GA4 Event Tag in Google Tag Manager and tested it in Preview Mode. The results of this test verified that different URLs and HTTP status codes appeare in the variables, meaning that it works accurately. The test also showed us that event parameters we set up it captured important information such as the error code, error description, referrer and the timestamp.
How To View HTTP Status Code Error Event in Google Analytics 4
Once you can see the statuscodeerror event in GA4 Realtime, build a custom Exploration report filtered by that event. Cross-reference the highest-frequency error URLs against your technical SEO audit results to check for canonicalisation or redirect issues, and use the broken internal link checker to trace which source pages are still pointing to the broken URLs.
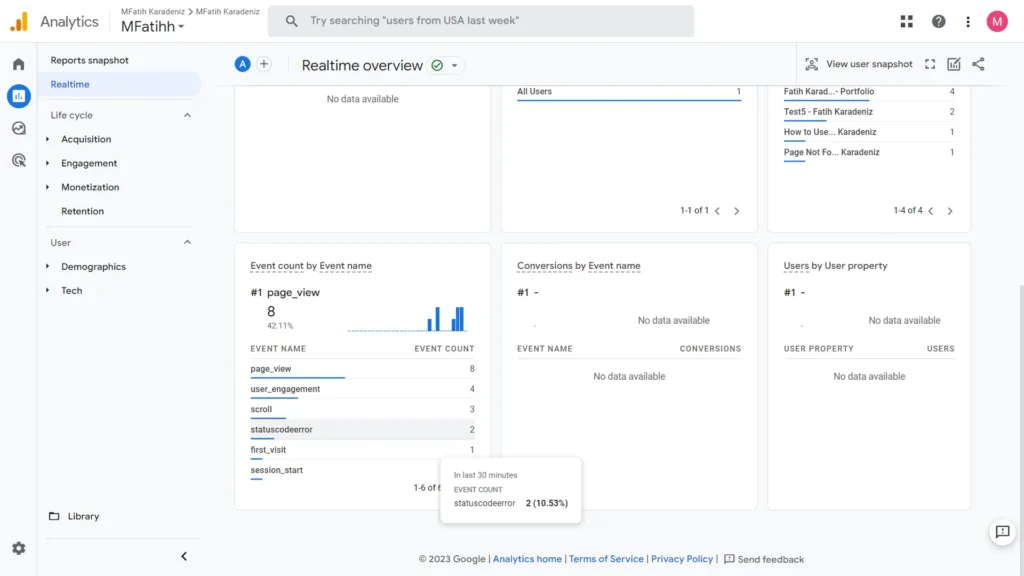
To see if HTTP Status Code Error Event accurately transfers data to Google Analytics let's open our Google Analytics 4 Property.
Click Reports
Choose Realtime
Scroll Down and Click "statuscodeerror"
Here we can view how many times our tag has been fired and the parameters with which each occerence of the HTTP Status Code Error event such as Error Code, Page URL, Timestamp, Referrer and more.